Tips for Generating Realistic Girls with AI
━━━━━━━━━━
①Avoid Perfection
Actively incorporate real-life "imperfections" like pores, peach fuzz, fingerprints on glass, and subtle noise. Adding a slight flush of color or a faint sheen on the T-zone makes it look more authentic
②Utilize Light and Reflection
Catchlights from fluorescent lamps, double reflections through glass, white light from vending machines, reflections from store lighting. If the handling of light feels natural, it instantly becomes realistic!
③Detail the Skeleton and Texture
Specify in great detail: the thickness of the collarbone, length of the jaw, variation in lip fullness, shoulder width, slenderness of the neck, and more. For clothing, describing shadows and textures like seams, wrinkles, and the matte feel of nylon is a plus◎
④Thoroughly Replicate Smartphone Camera Feel
Equivalent to a wide-angle lens of 24-28mm, natural depth of field, light HDR processing, and adding a bit of noise for a grainy texture will give it that familiar smartphone photo quality.
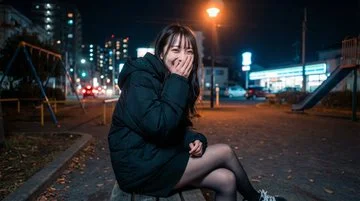
⑤Make Expressions Natural
Rather than a full-on smile, things like "a slightly annoyed blank expression" or "covering the mouth with a hand while laughing" create a natural, candid moment that looks real when captured on a smartphone
━━━━━━━━━━
Example prompts for this image are in the replies
Please give generating realistic girl images a try